
Views: 1.1KExecutions: 137ExecutionsHow many times people ran this script. Copying it, downloading it or running it with the raw link all count. Max 10 per person a day.
VerifiedBetter UI Dragging system

- Keyless
- Mobile untested
Advertisement
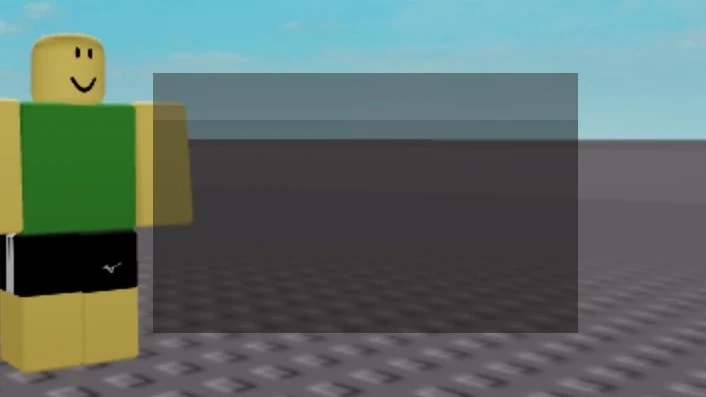
# Dummy UI Script How It Works, How To Extend It ## What This Script Does This script constructs a small floating window on your screen. The window has a grab-and-drag header bar plus some space underneath for content. It is scripted entirely without images, non-roblox modules, or dependencies.
The window is parented to a Screen Gui parented to Core Gui so it appears over most other game UI.
The entire thing is transparent to 0.5 so you can see through the panels, which makes it more useful as a placeholder, a stub, or a shell around a larger project. This is roughly 70 lines of minimal effective code, enough to clone and paste and run as an executor script, immediately producing a draggable window you can add on to. ## The Two Pieces It can be viewed as two halves. The first half is the drag system.
It consists of the helper function IsMouse Over Frame and the setup function Make Draggable.
These two do not know about your UI, only about how to check whether a point is in a frame, and how to drag a frame with the mouse. The second half is the constructed UI. It creates the Screen Gui, Main Frame, Header, Header Hitbox, and Content.
It then calls Make Draggable(Main Frame, Header Hitbox) to tie the two halves together. This separation matters. You can change the shape of the window to your heart's content without reworking the drag logic, and you can reuse the drag logic for other windows without rewriting it.
How the Drag System Works The code listens to three Roblox input events.
First is Drag Frame. Input Began. When the user presses down on the header, this event fires. Before it accepts the press, the script requires that the input state be Begin, the input type be MouseButton1 or Touch, and that the press occurred inside the header hitbox.
If those conditions are met, it records the starting mouse position, the starting frame position, and stores the hit object in case it is a touch.
It sets dragging to true. Next is User Input Service. Input Changed.
When the mouse or finger moves, this fires repeatedly. If the script is dragging, and the input matches the one that started the drag (mouse for mouse, same touch object for touch), then the script calculates how far the mouse moved since drag start and offsets the frame by that amount. Finally is User Input Service.
Input Ended.
When the user releases mouse or finger, this fires. It checks whether the released input matches the one that started the drag, then resets all the saved drag state. CurrentTouch exists for mobile because multiple fingers can be down at once, and Input Changed and Input Ended fires for all of them. By comparing the touch object that inputbegan to the one that inputended, the script ensures that only that single finger can drag the window. Drags initiated by other fingers tapping elsewhere are ignored.
IsMouse Over Frame does manual hit testing instead of relying on the built in handling of GUI input events.
This is an explicit choice. Doing manual hit tests gives you full control over which frame is considered the header handle, and it will work even if the header has a button on top of it, or if the frame has transparent sections. It reads Absolute Position and Absolute Size, the on screen pixel coordinates of the frame, and checks whether the mouse position is within that rectangle.
How the UI Is Built The Screen Gui is named DummyUI and parented to gethui() if that exists, or to Core Gui otherwise. The gethui check exists because some executors protect Core Gui from direct child creation. If gethui exists, it returns a safe folder that has the same interface as Core Gui.
Before creating the new DummyUI, the script searches the parent for an existing DummyUI and destroys it.
Thus two runs of the script will not stack UI. The Main Frame is a 180x110 pixel frame centered onscreen, with Background Transparency set to 1 so it itself is invisible. The children draw the frame and label edges. Active is set to true so that the frame receives input.
The Header is 20 pixels tall at the top of the Main Frame, and is dark gray at 0.5 transparency.
It is the visible bar at the top. The Header Hitbox is a Text Button covering the entire header, fully transparent, with no text, and Auto Button Color off. This node exists solely for input, but because it is a button it reliably receives Input Began even if another object overlaps the header.
This is the node you give to Make Draggable. The Content frame is an invisible container for other UI below the header. It sits within the Main Frame.
It has the same dark tint as the header at 0.5 transparency, but is darker than the header.
Nothing is in it right now, but this is where you put your sliders or buttons or anything else. ## Why Transparency 0.5 You might ask: Why not just make the panels visible all the time? Transparency 0.5 makes the panels half transparent. This way you see the outline, but not the color, and you can also see the world through it.
This makes the window less obtrusive, and can help when you are lining it up to an underlying object or world feature.
If you want solid color, set both values to 0. If you want to be able to see through but not see the color, set both values to 1. ## Example: Labeling the Window To label the window header, add a Text Label inside the Header (not the hitbox), so it does not block dragging. ``lua local Title = Instance.new("Text Label") Title.
Size = UDim2.new(1, -8, 1, 0) Title. Position = UDim2.new(0, 8, 0, 0) Title.
Background Transparency = 1 Title.
Text = "My Window" Title.
TextColor3 = Color3.new(1, 1, 1) Title. Text Size = 12 Title. TextXAlignment = Enum. TextXAlignment.
Left Title.
Parent = Header Because it is parented to Header, the label does not stop drag input from passing through to the header below. If you parented the label to Header Hitbox instead, it would block drags, but it might be more convenient for the user if it was a UI element that floated over the hitbox. ## Example: Adding a Button to the Content To add a button to the window, parent a Text Button to Content like this: lua local btn = Instance.new("Text Button") btn.
Size = UDim2.new(0, 80, 0, 24) btn. Position = UDim2.new(0, 6, 0, 6) btn. Text = "Click" btn.
Parent = Content btn.
MouseButton1Click:Connect(function() print("clicked") end) The button sits in Content, which sits in Main Frame. Because Main Frame is not a drag node, clicking the button does not initiate dragging the window. Only clicking the header button initiates dragging, so that is preferable. ## Example: Adding a Minimize Button To add a minimize button to the window, do something like this: lua local minimized = false local fullSize = Main Frame.
Size local headerSize = UDim2.new(fullSize.X.
Scale, fullSize.X. Offset, 0, 20) local minBtn = Instance.new("Text Button") minBtn. Size = UDim2.new(0, 16, 0, 16) minBtn.
Position = UDim2.new(1, -20, 0, 2) minBtn. Text = "-" minBtn. Parent = Header minBtn.
MouseButton1Click:Connect(function() minimized = not minimized Content.
Visible = not minimized Main Frame. Size = minimized and headerSize or fullSize end) `` The minimize button is parented to the header, so it needs ZIndex.
Advertisement
Share what works, ask questions, or report an issue.
No comments yet. Be the first to share your experience with this script.
86 lines · 2.9 KB

VaidhenLolz1Guts & Blackpowder
![[OpenSource] TwentyOne AssistSidebar](/_next/image?url=%2Fassets%2Fscripts%2F6ac491863c4292a0bde8a418_1791267207612_dRGInwqitB_0.webp&w=3840&q=75)

Skidder♠ Twenty One

![Auto guess color [ui best stability]](/_next/image?url=%2Fassets%2Fscripts%2F6a8b1fa8eae8175a5578a4e0_1787502507387_5PGqX42x6S_0.webp&w=3840&q=75)

P22Guess the logo color

stressedArsenal

bankrollOne Tap
VeilSERVICERIVALS
Tap a chip for community notes